Metasploit is an open source project created by H.D Moore that facilitates the exploitation of security vulnerabilities in intrusion tests.
It is divided into modules that implement different functionalities, so it is extremely easy to increase the functions of the tool.
Metasploit has 4 different interfaces: msfconsole, msfcli, Armitage and web. However, in this post I will focus on explaining the most used one, the metasploit msfconsole command console.
Accessing it is very simple, just lift the database and write to the msfconsole terminal. Both Kali and Parrot have it installed (if you haven’t decided on an operating system yet, maybe you should read this post):

But before we start, comment that metasploit has a set of tools that can be launched independently, without having to load the entire framework to use them. Below is a brief summary of the most important ones:
Unify the Msfpayload and Msfencode tools.
Msfpayload allows the generation of shellcodes in different programming languages, as well as the creation of executables that inject malicious code into the target.
Msfencode prevents IDS, antivirus, etc. from detecting the file (payload) that we have created with Msfpayload. Broadly speaking, it’s an obfuscator.
Msfescan scans Windows exes or DLLs to get the machine code, while msfelfscan does this in Linux ELF applications.
It is used for the development of exploits. Scans a binary and returns usable gadgets.
Allows you to create a Metasploit daemon that listens to a port, and that can connect a client using netcat.
In the next posts I will talk about these specific tools, given the tremendous potential that some of them have, like msfvenom.
Terminology
Before we continue, I will explain some key terms for pentesting.
First, let’s understand what an exploit is. An exploit is a code that allows an attacker to exploit a vulnerability. It consists of two parts: the malicious code and the payload.
The malicious code will be the one that exploits a certain vulnerability in a system. The payload is the one that establishes a connection between attacker and victim.
There are three types of payloads. First of all, we have the single payloads. These perform specific tasks, such as creating a user, executing a command, or bending a shell. Secondly, we find payloads of the stager type. These are used to create a connection between victim and attacker. They are used to load the victim with the third type of payload, the staged type. Finally, staged payloads are used to perform complex tasks, such as creating a meterpreter console (a special shell that allows you to perform many more actions than a normal one).
In short, the choice of the correct payload is vital, and it will depend on whether the exploit is successful or not. However, it should be noted that there are other “auxiliary” type modules that can be executed by metasploit and do not require the use of payload.
On the other hand, there are quite a few pages that list exploits. Among them, we can find 0day.today, exploit-db or rapid7.
In these pages we can find the latest known exploits for the different systems. However, as the exploitation of vulnerabilities is the third stage of an audit (preceded by the collection of information and analysis of vulnerabilities), it will not be surprising to find that the system has some vulnerabilities with CVE.
The CVE (Common Vulnerabilities and Exposures) is the standard that lists known vulnerabilities. Whatever vulnerability you want to exploit, it almost certainly has an associated CVE. And by using programs like nmap, you’re likely to discover these codes. A very interesting page to know what vulnerability a CVE corresponds to, what degree of risk (or CVSS) it has, what is needed to exploit it, and much more, is cvedetails. There are other pages that contain this information, but the good thing about cvedetails is that in each vulnerability it tells you which metasploit module you should use to exploit it:

Basic Commands
| Command | Description |
|---|---|
| db_status | To view the status of the database |
| db_import | Imports the scan to the database |
| hosts | Show hosts |
| services | Shows the services of each port |
| vulns | Shows the vulnerabilities |
| creds | Shows the credentials |
| search | Search for all exploits of type “term” |
| use | To use the exploit |
After choosing an exploit, we can apply the following commands:
| Command | Description |
|---|---|
| > info | It gives you information about that exploit |
| > show payloads | All exploits must be attached to a payload. This command shows the payloads that there are for that exploit. However, it is not necessary for the assistants. |
| > set payload | Select the payload |
| > show options | It shows you what you need to fill in to successfully launch that exploit. What is shown here as mandatory and empty, it is essential to fill it in to successfully execute the exploit. |
| > set rhost 8.8.8.8 | Example of how to fill in the necessary options to launch an exploit. In this case, the remote host is specified. |
| > set cmd ls | It is specified for a given exploit and payload that the command to be launched is “ls”. |
| > exploit | Launch the exploit. |
| > run | When you run an auxiliary exploit, you have to write run to run it, instead of exploit. |
| > unset | Deletes the information associated with the option. |
These are the most interesting commands, but we can get a complete list of commands by typing “help“.
Now, as a PoC, I will show you a simple example where I use metasploit to get a shell on a windows server 2008 where I discovered that the CVE-2017-0144 vulnerability, better known by its nickname “EthernalBlue“, could be exploited:
PoC: Getting a shell with metasploit
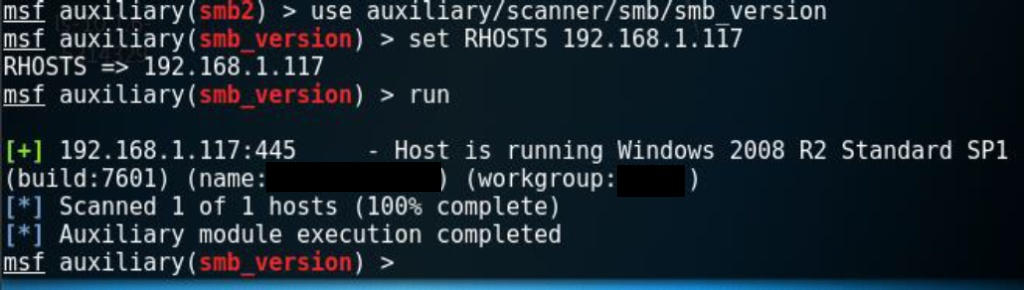
First of all, when investigating this vulnerability we found out that it affects systems that use SMB 2. So I proceeded to use the auxiliary/scanner/smb/smb/smb2 module, to find out if the victim machine supported it.

Next, and to be sure, I ran another auxiliar module that indicates if the version is suitable for that vulnerability.
It is! Therefore, we proceed to exploit it, with the exploit “ms17_010_eternalblue”:

And that’s it. As we can see, we got a shell on the victim machine thanks to metasploit.
This has been a little proof of concept I have done to teach you the basic use of metasploit. However, in a real environment it would not have been so easy. Metasploit has a lot more features that I couldn’t explain because they didn’t fit in an introduction post.
And now that we’ve got a shell, we’ll have to move on to post-exploitation: the escalation of privileges, pivoting and backdoors. But I’ll leave that for future posts.
Lethani.